Aproape totul despre soda caustică și utilizarea acesteia!

Aproape totul despre soda caustică și utilizarea acesteia!

Cu toții am auzit despre soda caustică și despre utilizarea ei drept ingredient principal pentru crearea săpunului. Cu toate acestea, produsul are mult mai multe proprietăți, despre care poți afla mai multe în rândurile următoare.

Soda caustică este folosită cu succes în industrie, în locuința proprie sau în grădină. Dacă nu știi despre ce vorbim – deși ne îndoim, poate o cunoști mai bine sub numele de leșie. Este un produs foarte toxic, în special dacă este ingerat sau inhalat, dar eficiența sa ridicată îl face să fie foarte utilizat. În comerț este comercializat, de regulă, în pungi de 1 kg, iar aici https://www.agmarket.ro/soda-caustica-1kg găsești exact ceea ce ai nevoie.

Ce este soda caustică?

Pentru a defini soda caustică, trebuie să ne amintim puțin de chimie. Avem de a face cu o substanță chimică anorganică, solubilă în apă, și cu un pH de 14. În magazinele de specialitate soda caustică este comercializată sub formă de fulgi, ambalați fosrte bine în pungi de câte un kilogra.

Aminteam ceva mai sus de faptul că are un pH foarte ridicat și are o toxicitate ridicată.

Din acest motiv este complet interzisă folosirea acestui produs fără mănuși de protecție, deoarece afectează pielea, o ”arde”, așa cum se spune în limbaj popular.

Agent de înălbire și curățare

Mamele sau bunicile noastre foloseau mult soda caustică, sau leșia, pentru a face săpun de casă, un produs foarte eficient pentru curățare.

De altfel, aceasta este și cea mai cunoscută proprietate a sodei caustice, fiind un excelent agent de înălbire și curățare. De asemenea, la aceste caracteristici se adaugă și cea de dezinfectare. Dar, încă o dată, rețineți că deși se dizolvă foarte ușor în apă, nu trebuie niciun moment să îi uiți toxicitatea, deoarece riști incidente neplăcute, care pot culmina chiar și cu pierderea vieții, în caz de ingerare accidentală a acesteia și neprezentarea cât mai repede la spital pentru remedierea problemei.

Soda caustică în industrie

Am discutat până acum despre folosirea sodei caustice în locuința personală. Dar nu trebuie să uităm că avem de a face cu un produs chimic, care este utilizat foarte mult și în industrie. Există numeroase ramuri industriale unde soda caustică se folosește, iar cele mai cunoscute sunt: extragerea și obținerea celulozei și hârtiei din lemn, prelucrarea materialelor plastice, obținerea de săpun, detergenţi, chiar și coloranţi.

Face bumbacul mai moale

Cu toții adorăm hainele din bumbac, mult mai prietenoase cu pielea noastră. Dar suntem siguri că nu știai că soda caustică este cea care îl face pe acesta mult mai moale, mătăsos, plăcut la atingere. Și, pentru că tot suntem la industria textilă, prelucrarea fibrelor artificiale se face tot cu ajutorul ei.

Necesară pentru obținerea aluminiului și uleiului alimentar

Este imposibil să prezinți toate ramurile industriale și modul în care soda caustică este folosită în ele. Cu toate acestea, nu trebuie să uităm că este indispensabilă pentru obținerea aluminiului, dar și pentru rafinarea chimică a uleiului alimentar.

Soda caustică în locuință

Cu toate că sunt conștiente că avem de a face cu un produs toxic, gospodinele nu pot renunța la folosirea sodei caustice în propria locuință. Este și normal dacă ne gândim că petele rezistente de murdărie sunt eliminate mai ușor cu ajutorul ei, chiar și când sunt prezente pe țesături. Soda caustică este folosită foarte des pentru curățarea, dar și dezinfectarea rapidă și eficientă a celor mai multe obiecte ceramice din baie.

Ai probleme cu țevile înfundate? 

Nicio problemă, folosește – evident, cu precauțiile de rigoare, soda caustică, pentru a scăpa de dopurile de murdărie care se formează în scurgeri și instalații. În gospodărie se recomandă folosirea produsului rezultat din diluarea fulgilor de sodă în apă.

Vase perfect curate și strălucitoare

Știi, desigur, de faptul că soda caustică este și un excelent produs degresant, și de aceea poate fi folosită pentru vase perfect curate și strălucitoare, în special cele ceramice, sau cele realizate din Teflon, aluminiu sau inox. Chiar și tacâmurile de bucătărie pot avea parte de acest tratament special, iar prietenii care vor veni la tine la masă vor rămâne surprinși de cât de bine arată acestea, chiar și după ani de folosire îndelungată!

Fă-ți singură săpunul de casă!

Chiar dacă acum găsim numeroase produse pentru curățenie, multe dintre gospodine încă prefere să-ți creeze singure săpunul. Nu este deloc complicat, și ai nevoie de sodă caustică, uleiul vegetal, uleiuri esenţiale – aici poți alege orice aromă îți place şi apa distilată.

Curățarea obiectelor de îngrijire personală

Soda caustică este recunoscută, după cum aminteam ceva mai sus, ca fiind un produs care te ajută să dezinfectezi eficient suprafețele. De aceea, îl poți folosi pentru dezinfectarea și chiar degresarea obiectelor de îngrijire personală.

Agent antimicrobian în ferme

Cei care au multe animale știu că au în soda caustică un aliat de nădejde. Cu atât mai mult când vine vorba despre ferme mari, și unde acest produs este folosit grație eficacității sale de a îndepărta microbii. Prin urmare, se utilizează pentru a dezinfecta staulele sau adăposturile animale, în special după episoade de boală.

Precauții în utilizare

Pentru că este un produs chimic foarte toxic, se recomandă precauții în utilizarea acestuia. În caz contrar, te poți confrunta cu arsuri ale pielii, neplăceri oftalmologice și chiar intoxicații grave. Mănuși și mască de protecție este echipamentul necesar pentru manvrabilitatea în condiții optime a acestui produs. Pentru a-l păstra, produsul trebuie depozitat într-un loc uscat, ferit de razele solare. și nu în spații umede, pentru că reacționează în contact cu vaporii de apă.

De asemenea, nu trebuie folosită de copii, de persoanele cu afecțiuni psihice sau oftalmologice, și nici de cei care sunt alergici sau suferă de afecțiuni respiratorii.

Când se deschide dozatorul de săpun într-o mașină de spălat vase?

 Dishwashers are incredibly complex appliances. Everything it does, from filling with water to heating it to the right temperature, is done via its electric control board. So, when does the control board tell the dishwasher to open the soap dispenser?

The soap dispenser on a dishwasher will automatically open during the washing phase after the water has been heated to the appropriate temperature. The spring mechanism on the soap dispenser’s door will disengage, allowing water to pour into the dispenser before the detergent mixes with the water at the bottom of the tub.

In this guide, I’ll explain the entire dishwashing process from start to finish, and I’ll also talk about why your dishwasher’s soap dispenser door doesn’t open.

Dishwasher Process

Have you ever thought about how dishwashers work? Probably not, but I’ll explain anyway. The dishwasher process can be broken into 4 different phases—the pre-rinse phase, the washing phase, the rinsing phase, and the drying phase. However, the number of phases your dishwasher goes through depends on what commands you input into the machine.

Pre-Rinse Phase

Initial filling

After inputting the sequence of wash and add-on commands, the dishwasher will begin to fill with water. Depending on the dishwasher model, it will receive anywhere from 2 to 4 gallons of fresh water from the supply line. The water will fill the bottom of the dishwasher’s tub.

Note: It’s important that you do not pre-rinse your dishes before loading your dishwasher. Many modern dishwashers have sensors that fill the tub up with water based on how dirty your dishes are. Pre-rinsing your dishes may trick your dishwasher into receiving less water than necessary.

Pre-wash spray

The internal spray pump will take the water from the dishwasher’s tub and spray it all over your dishes. Your dishwasher will come with at least 2 spray arms for each dishrack.

Make sure your dishes are loaded in the correct way. Failing to load your dishwasher properly, including overcrowding the dishracks, may prevent the dishwasher from pre-washing your dishes thoroughly. You can check out our guide on overloading a dishwasher to know further about these issues.

Washing Phase

First heating

After the brief pre-wash step, the water will settle to the bottom of the tub. The dishwasher’s temperature control will activate, causing the heating element to increase the temperature of the water. The water is usually heated up to 130 to 140°F.

Mixing soap with the water

In case you’re wondering when the soap dispenser opens in a dishwasher, here it is.

After the water is heated up, the spray pump will turn back on. At the same time, the spring on the soap dispenser’s door will disengage, popping the door forward and allowing water from the spray arms to get into the dispenser. The soapy water trickles to the bottom of the tub, which is then pumped into the spray arms and distributed throughout the tub.

Draining

As all this is happening, the dishwasher’s internal timer will keep track of the duration of the wash cycle. When the pre-programmed time has expired, the spray arms will turn off, forcing all the water down to the base of the tub. The dishwasher’s drain pump will activate, forcing the dirty water past the filter assembly and through the drain line.

Rinsing Phase

Final filling

For the last time, your dishwasher will receive more water from the supply line. Again, it will receive between 2 and 4 gallons of water, depending on the model.

Heating

The dishwasher’s heating element will increase the temperature of the water to a slightly higher degree than the washing phase. After the water is at the correct temperature, the dishwasher’s spray pump will activate again and distribute fresh, heated water throughout the dishwasher.

Drying Phase

Final draining and drying

Final draining and drying

After your dishes have been thoroughly rinsed, the dishwasher will, for the final time, activate its drain pump to get rid of the water. When all the water has been drained, the dishwasher will turn on.

The residual heat from the rinsing water will draw moisture away from your dishes, which will leave them as dry as a bone after 10 to 30 minutes of waiting. During this time, you should refrain from opening the dishwasher door.

Dishwasher Soap Dispenser Door Not Opening

Dishwasher Soap Dispenser Door Not Opening

One clear sign that your dishwasher’s soap dispenser door isn’t opening is that your dishes come out streaky and/or greasy. Since the water can’t mix with the detergent, your dishes won’t get the full washing experience.

So, why isn’t the dishwasher soap dispenser door opening? There are several reasons for this:

Blockage in the door

The first thing you should look for is caked-on debris around the soap dispenser’s door. The debris could prevent the door from opening all the way or opening at all, which will prevent soap from mixing with the heated water.

To get rid of the blockage, take a moistened paper towel and clean the soap dispenser’s door thoroughly. You can also use a bamboo skewer to gently pry away any solid bits of debris keeping the door from snapping open.

Faulty Wax motor

The wax motor is the part of the dishwasher that is responsible for opening the soap dispenser at the right time. If there’s nothing wrong with the door, you should inspect the wax motor for damage.

You can do this by shutting off the dishwasher, unplugging it, opening the dishwasher’s door, and inspecting the wax motor, which is located inside the dishwasher door. You may need to remove the inner door panel to access the wax motor. If a multimeter doesn’t detect continuity, you will need to replace the wax motor.

Faulty bi-metal release

Older dishwashers don’t have wax motors. Instead, they come with a bi-metal release that opens the soap dispenser and keeps it shut. It works similarly to a wax motor, and you’ll need to crack open your dishwasher to locate it.

Open the exterior panel of the dishwasher’s door and locate a metal key-shaped component near the soap dispenser. It’s controlled by an electric motor, which you can test with a multimeter. If it doesn’t detect continuity, you will need to replace the bi-metal release.

Faulty timer

The electric control board is responsible for turning the timer on and off. If the timer is out of whack, it could prevent the soap dispenser from opening at the right time. Fixing this is a huge feat that requires a bit of engineering know-how, so you should leave it up to the pros.

Faulty soap dispenser

Sometimes, the entire soap dispenser mechanism may be broken. This can happen when your dishwasher reaches the ripe age of 10 years and older. However, after the decade mark, you might want to consider getting a new, younger dishwasher model that’s more energy- and water-efficient.

If the soap dispenser isn’t working as it should, you will need to replace the entire component.

Can I Use a Dishwasher with a Faulty Soap Dispenser?

Yes, you absolutely can!

Just because the soap dispenser doesn’t open doesn’t mean the timer, the spray pump, the drain pump, and everything else will stop what it’s doing. While a functioning soap dispenser mechanism is ideal, you can find a way around it and still get the best from your dishwasher.

To use a dishwasher without the soap dispenser, simply add the detergent, pod, or tablet to the bottom of the dishwasher tub. During the initial filling step, the water will mix with the soap. Heated water will eventually dissolve tablets and pods.

Gomasio (Japanese Sesame Salt)

 HOMEMADE GOMASIO (JAPANESE SESAME SALT)  Japan’s famous low-sodium, flavorful and umami-rich seasoning blend that is as versatile as it is delicious! Toasted sesame seeds are ground and tossed with sea salt to create a unique blend that you’ll be glad to reach for at the dinner table!

gomasio recipe japanese sesame salt seasoning blend authentic traditional low sodium

My Latest Videos

0 of 1 minute, 54 secondsVolume 0%
 
Next
Stay

Making your own gomasio couldn’t be simpler.  Also spelled gomashio, this simple seasoning blend has just two ingredients but the flavor impact it has on food is fabulous!

What is Gomasio?

Gomasio, which translates to “sesame salt”, is a Japanese seasoning blend made from whole sesame seeds and salt.  A variation includes dried seaweed.  Gomasio is naturally gluten free and vegan.  It is a table condiment, often sprinkled over a variety of foods to add flavor and a touch of saltiness.

Gomasio has a very low ratio of salt so it is a perfect low sodium seasoning.  When the sesame seeds are toasted their oils are released and coat the salt granules, boosting their flavor.

Gomasio is often a staple part of a macrobiotic diet which is drawn from Zen Buddhism and whose goal is to balance yin and yang.

How to Use Gomasio

Consider this a very unique all-purpose seasoning blend.  Here are just a few ways you can use it:

  • On rice, noodles and rice balls
  • Sprinkled on salads
  • In stir fries
  • Sprinkled on soups
  • With sushi and California rolls
  • Tossed in popcorn
  • Sprinkled over steamed vegetables and beans

    How to Make Gomasio

    Making gomasio is very simple and uses only two ingredients:  Sesame seeds and salt.

    Gomasio is traditionally made with unhulled sesame seeds, meaning the outer layer is intact.  This also adds a bit of bitterness.  You can also use hulled sesame seeds if you prefer to cut back on the bitter flavor.  The sesame seeds are toasted until golden brown and left to cool before grinding them and combining them with the salt.

    Use good sea salt.  My preference is to use flaky sea salt (I LOVE Maldon Salt) because the flakes add a great texture to the seasoning blend.

    For another variation you can add a small strip of kombu or other dried seaweed and crush it with the toasted sesame seeds.Let’s get started!

    Place a dry skillet over medium-high heat and add the sesame seeds.  Toast them until they are golden brown, stirring regularly.  Be very careful that they don’t burn or they will be bitter.

    toasting sesame seeds
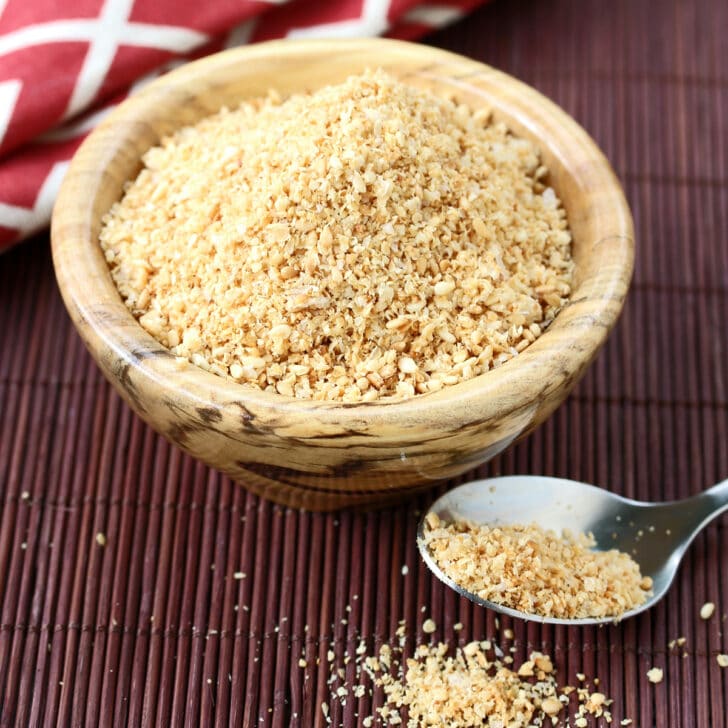
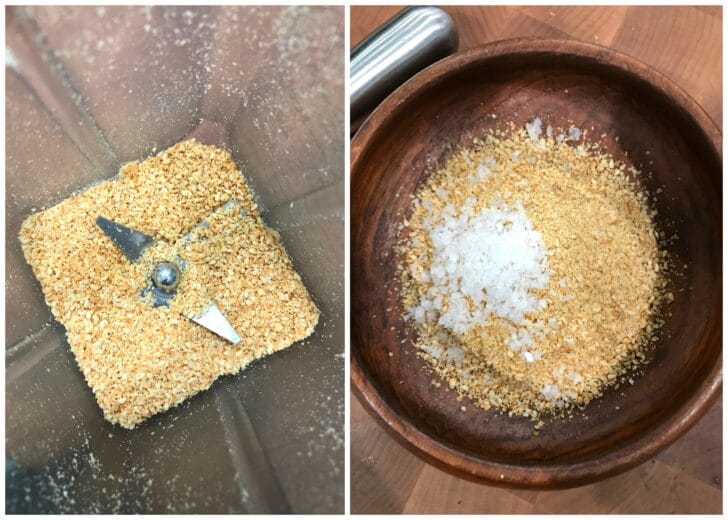
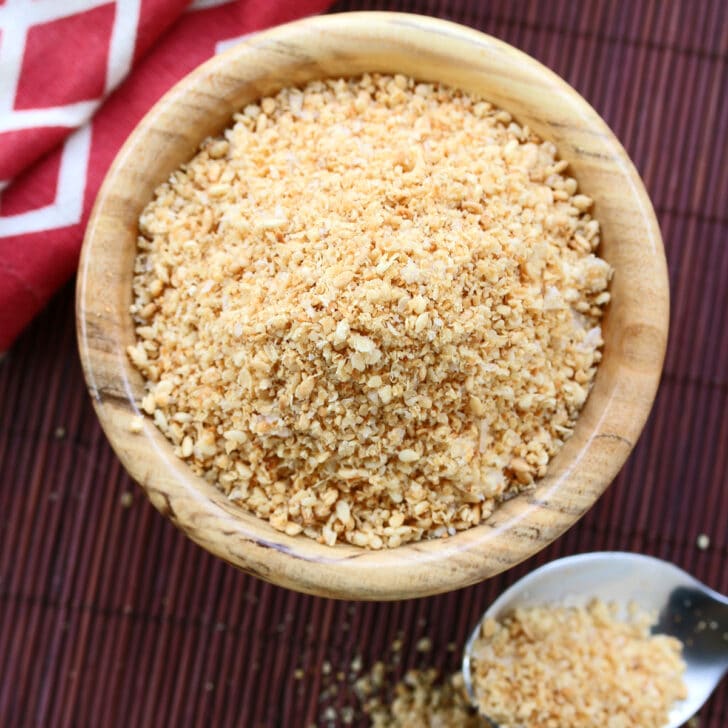
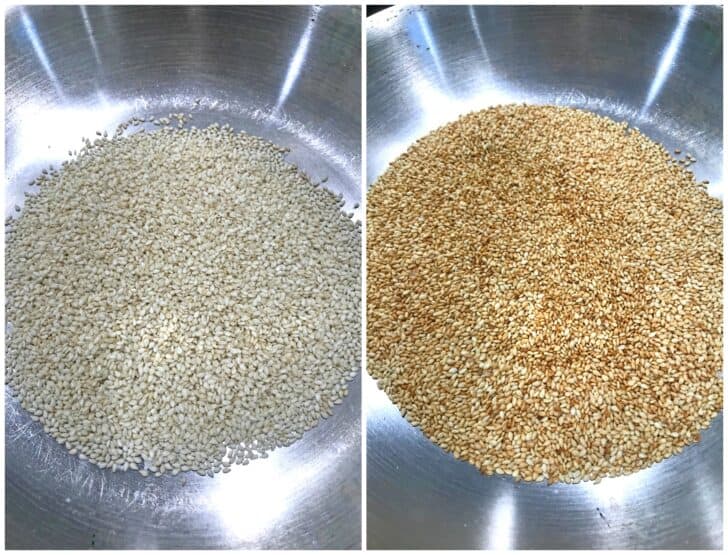
Let the seeds cool completely and then crush them either with a mortar and pestle or in a blender or food processor.  The mixture should remain chunky and not be a fine powder.  Place the crushed sesame seeds in a bowl and stir in the salt.

    grinding sesame seeds and stirring in salt

  • Store your gomasio in an airtight jar in a cool place.  It will keep for a few months but for maximum flavor use within a month.

    Enjoy!

    gomasio recipe japanese sesame salt seasoning blend authentic traditional low sodium